Table of Contents
This tutorial will show how to provide some color to the triangle from the previous tutorial. Instead of just giving the triangle a solid color, we will use two methods to provide it with varying color across its surface. The methods are to using the fragment's position to compute a color and to using per-vertex data to compute a color.
As we stated in the overview, part of the fragment's data includes the position of the
fragment on the screen. Thus, if we want to vary the color of a triangle across its
surface, We can access this data in our fragment shader and use it to compute the final
color for that fragment. This is done in the Fragment
Position tutorial, who's main file is
FragPosition.cpp.
In this tutorial, and all future ones, shaders will be loaded from files instead of
hard-coded strings in the .cpp file. To support this, the framework has the
Framework::LoadShader and
Framework::CreateProgram functions. These work similarly to the
previous tutorial's CreateShader and
CreateProgram, except that LoadShader
takes a filename instead of a shader file.
The FragPosition tutorial loads two shaders, the vertex shader
data/FragPosition.vert and the fragment shader
data/FragPosition.frag. The vertex shader is identical to the
one in the last tutorial. The fragment shader is very new, however:
Example 2.1. FragPosition's Fragment Shader
#version 330

out vec4 outputColor;

void main()
{
    float lerpValue = gl_FragCoord.y / 500.0f;

    outputColor = mix(vec4(1.0f, 1.0f, 1.0f, 1.0f),
        vec4(0.2f, 0.2f, 0.2f, 1.0f), lerpValue);
}
gl_FragCoord is a built-in variable that is only available in a
fragment shader. It is a vec3, so it has an X, Y, and Z
component. The X and Y values are in window coordinates, so the
absolute value of these numbers will change based on the window's resolution. Recall
that window coordinates put the origin at the bottom-left corner. So fragments along the
bottom of the triangle would have a lower Y value than those at the top.
The idea with this shader is that the color of a fragment will be based on the Y value of its window position. The 500.0f is the height of the window (unless you resize the window). The division in the first line of the function simply converts the Y position to the [0, 1] range, where 1 is at the top of the window and 0 is at the bottom.
The second line uses this [0, 1] value to perform a linear interpolation between two
colors. The mix function is one of the many,
many standard functions that the OpenGL Shading Language
provides. Many of these functions, like mix, are vectorized. That
is, some of their parameters can be vectors, and when they are, they will perform their
operations on each component of the vector simultaneously. In this case, the
dimensionality of the first two parameters must match.
The mix function performs a linear interpolation. It will return
exactly the first parameter if the third parameter is 0, and it will return exactly the
second parameter if the third parameter is 1. If the third parameter is between 0 and 1,
it will return a value between the two other parameters, based on the third
parameter.
Note
The third parameter to mix must be on the range [0, 1].
However, GLSL will not check this or do the clamping for you. If it is not on this
range, the result of the mix function will be undefined.
“Undefined” is the OpenGL shorthand for, “I do not know, but
it is probably not what you want.”
We get the following image:
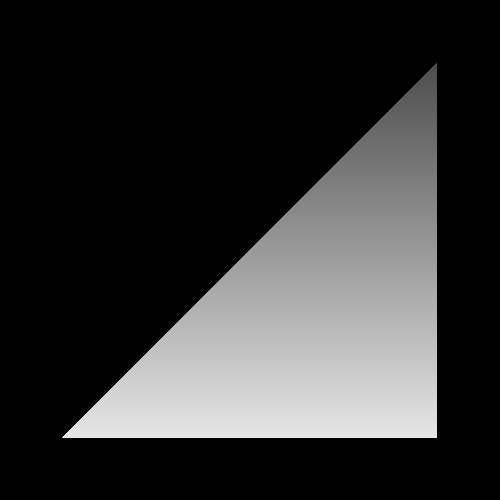
In this case, the bottom of the triangle, the one closest to a Y of 0, will be the most white. While the top of the triangle, the parts closest to a Y of 500, will have the darkest color.
Other than the fragment shader, nothing much changes in the code.