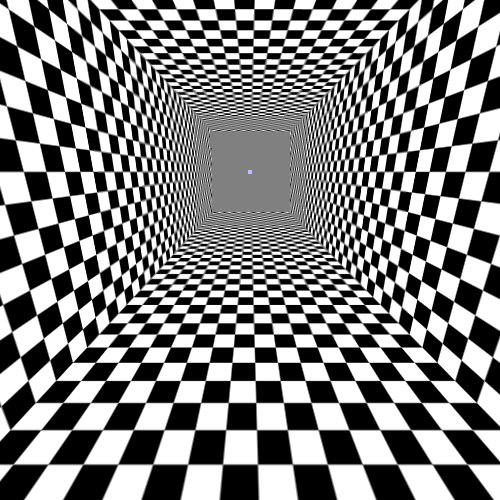
Speaking of distracting, let's talk about what is going on in the distance. When the camera moves, the more distant parts of the texture look like a jumbled mess. Even when the camera motion is paused, it still doesn't look like a checkerboard.
What is going on there is really simple. The way our filtering works is that, for a given texture coordinate, we take either the nearest texel value, or the nearest 4 texels and interpolate. The problem is that, for distant areas of our surface, the texture space area covered by our fragment is much larger than 4 texels across.

The inner box represents the nearest texels, while the outer box represents the entire fragment mapped area. We can see that the value we get with nearest sampling will be pure white, since the four nearest values are white. But the value we should get based on the covered area is some shade of gray.
In order to accurately represent this area of the texture, we would need to sample from more than just 4 texels. The GPU is certainly capable of detecting the fragment area and sampling enough values from the texture to be representative. But this would be exceedingly expensive, both in terms of texture bandwidth and computation.
What if, instead of having to sample more texels, we had a number of smaller versions of our texture? The smaller versions effectively pre-compute groups of texels. That way, we could just sample 4 texels from a texture that is close enough to the size of our fragment area.

These smaller versions of an image are called mipmaps; they are also sometimes called mipmap levels. Previously, it was said that textures can store multiple images. The additional images, for many texture types, are mipmaps. By performing linear sampling against a lower mipmap level, we get a gray value that, while not the exact color the coverage area suggests, is much closer to what we should get than linear filtering on the large mipmap.
In OpenGL, mipmaps are numbered starting from 0. The 0 image is the largest mipmap, what is usually considered the main texture image. When people speak of a texture having a certain size, they mean the resolution of mipmap level 0. Each mipmap is half as small as the previous one. So if our main image, mipmap level 0, has a size of 128x128, the next mipmap, level 1, is 64x64. The next is 32x32. And so forth, down to 1x1 for the smallest mipmap.
For textures that are not square (which as we saw in the previous tutorial, is perfectly legitimate), the mipmap chain keeps going until all dimensions are 1. So a texture who's size is 128x16 (remember: the texture's size is the size of the largest mipmap) would have just as many mipmap levels as a 128x128 texture. The mipmap level 4 of the 128x16 texture would be 8x1; the next mipmap would be 4x1.
Note
It is also perfectly legal to have texture sizes that are not powers of two. For them, mipmap sizes are always rounded down. So a 129x129 texture's mipmap 1 will be 64x64. A 131x131 texture's mipmap 1 will be 65x65, and mipmap 2 will be 32x32.
The DDS image format is one of the few image formats that actually supports storing all of the mipmaps for a texture in the same file. Most image formats only allow one image in a single file. The texture loading code for our 128x128 texture with mipmaps is as follows:
Example 15.1. DDS Texture Loading with Mipmaps
std::string filename(LOCAL_FILE_DIR);
filename += "checker.dds";

std::auto_ptr<glimg::ImageSet> pImageSet(glimg::loaders::dds::LoadFromFile(filename.c_str()));

glGenTextures(1, &g_checkerTexture);
glBindTexture(GL_TEXTURE_2D, g_checkerTexture);

for(int mipmapLevel = 0; mipmapLevel < pImageSet->GetMipmapCount(); mipmapLevel++)
{
    glimg::SingleImage image = pImageSet->GetImage(mipmapLevel, 0, 0);
    glimg::Dimensions dims = pImage->GetDimensions();

    glTexImage2D(GL_TEXTURE_2D, mipmapLevel, GL_RGB8, dims.width, dims.height, 0,
        GL_BGRA, GL_UNSIGNED_INT_8_8_8_8_REV, image.GetImageData());
}

glTexParameteri(GL_TEXTURE_2D, GL_TEXTURE_BASE_LEVEL, 0);
glTexParameteri(GL_TEXTURE_2D, GL_TEXTURE_MAX_LEVEL, pImageSet->GetMipmapCount() - 1);
glBindTexture(GL_TEXTURE_2D, 0);
Because the file contains multiple mipmaps, we must load each one in turn. The GL
Image library considers each mipmap to be its own image. The
GetDimensions member of
glimg::SingleImage returns the size of the particular
mipmap.
The glTexImage2D function takes the mipmap level to load as the
second parameter. The width and height parameters represent the size of the mipmap in
question, not the size of the base level.
Notice that the last statements have changed. The
GL_TEXTURE_BASE_LEVEL and GL_TEXTURE_MAX_LEVEL
parameters tell OpenGL what mipmaps in our texture can be used. This represents a closed
range. Since a 128x128 texture has 8 mipmaps, we use the range [0, 7]. The base level of
a texture is the largest usable mipmap level, while the max level is the smallest usable
level. It is possible to omit some of the smaller mipmap levels. Note that level 0 is
always the largest possible mipmap level.
Filtering based on mipmaps is unsurprisingly named mipmap filtering. This tutorial does not load two checkerboard textures; it only ever uses one checkerboard. The reason mipmaps have not been used until now is because mipmap filtering was not activated. Setting the base and max level is not enough; the sampler object must be told to use mipmap filtering. If it does not, then it will simply use the base level.
Mipmap filtering only works for minification, since minification represents a fragment
area that is larger than the texture's resolution. To activate this, we use a special
MIPMAP mode of minification filtering.
glSamplerParameteri(g_samplers[2], GL_TEXTURE_MAG_FILTER, GL_LINEAR);
glSamplerParameteri(g_samplers[2], GL_TEXTURE_MIN_FILTER, GL_LINEAR_MIPMAP_NEAREST);
The GL_LINEAR_MIPMAP_NEAREST minification filter means the
following. For a particular call to the GLSL texture function, it
will detect which mipmap is the one that is nearest to our fragment area. This detection
is based on the angle of the surface relative to the camera's view[8]. Then, when it samples from that mipmap, it will use linear filtering of the
four nearest samples within that one mipmap.
If you press the 3 key in the tutorial, you can see the effects of this filtering mode.
That's a lot more reasonable. It isn't perfect, but it is much better than the random motion in the distance that we have previously seen.
It can be difficult to truly understand the effects of mipmap filtering when using normal textures and mipmaps. Therefore, if you press the Spacebar, the tutorial will switch to a special texture. It is not loaded from a file; it is instead constructed at runtime.
Normally, mipmaps are simply smaller versions of larger images, using linear filtering or various other algorithms to compute a reasonable scaled down result. This special texture's mipmaps are all flat colors, but each mipmap has a different color. This makes it much more obvious where each mipmap is.
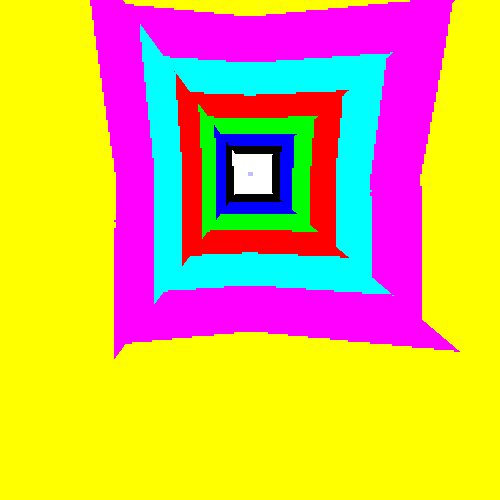
Now we can really see where the different mipmaps are. They don't quite line up on the corners. But remember: this just shows the mipmap boundaries, not the texture coordinates themselves.
The special mipmap viewing texture is interesting, as it demonstrates an issue you may need to work with when uploading certain textures: alignment.
The checkerboard texture, though it only stores black and white values, actually has all three color channels, plus a fourth value. Since each channel is stored as 8-bit unsigned normalized integers, each pixel takes up 4 * 8 or 32 bits, which is 4 bytes.
OpenGL image uploading and downloading is based on horizontal rows of image data. Each row is expected to have a certain byte alignment. The OpenGL default is 4 bytes; since our pixels are 4 bytes in length, every mipmap will have a line size in bytes that is a multiple of 4 bytes. Even the 1x1 mipmap level is 4 bytes in size.
Note that the internal format we provide is GL_RGB8, even
though the components we are transferring are GL_BGRA (the A
being the fourth component). This means that OpenGL will more or less discard the
fourth component we upload. That is fine.
The issue with the special texture's pixel data is that it is not 4 bytes in length. The function used to generate a mipmap level of the special texture is as follows:
Example 15.2. Special Texture Data
void FillWithColor(std::vector<GLubyte> &buffer,
                   GLubyte red, GLubyte green, GLubyte blue,
                   int width, int height)
{
    int numTexels = width * height;
    buffer.resize(numTexels * 3);

    std::vector<GLubyte>::iterator it = buffer.begin();
    while(it != buffer.end())
    {
        *it++ = red;
        *it++ = green;
        *it++ = blue;
    }
}
This creates a texture that has 24-bit pixels; each pixel contains 3 bytes.
That is fine for any width value that is a multiple of 4. However, if the width is 2, then each row of pixel data will be 6 bytes long. That is not a multiple of 4 and therefore breaks alignment.
Therefore, we must change the pixel alignment that OpenGL uses. The
LoadMipmapTexture function is what generates the special
texture. One of the first lines is this:
GLint oldAlign = 0;
glGetIntegerv(GL_UNPACK_ALIGNMENT, &oldAlign);
glPixelStorei(GL_UNPACK_ALIGNMENT, 1);
The first two lines gets the old alignment, so that we can reset it once we are
finished. The last line uses glPixelStorei
Note that the GL Image library does provide an alignment value; it is part of the
Dimensions structure of an image. We have simply not used
it yet. In the last tutorial, our row widths were aligned to 4 bytes, so there was
no chance of a problem. In this tutorial, our image data is 4-bytes in pixel size,
so it is always intrinsically aligned to 4 bytes.
That being said, you should always keep row alignment in mind, particularly when dealing with mipmaps.
Our mipmap filtering has been a dramatic improvement over previous efforts. However, it does create artifacts. One of particular concern is the change between mipmap levels. It is abrupt and somewhat easy to notice for a moving scene. Perhaps there is a way to smooth that out.
Our current minification filtering picks a single mipmap level and selects a sample from it. It would be better if we could pick the two nearest mipmap levels and blend between the values fetched from the two textures. This would give us a smoother transition from one mipmap level to the next.
This is done by using GL_LINEAR_MIPMAP_LINEAR minification
filtering. The first LINEAR represents the filtering done within
a single mipmap level, and the second LINEAR represents the
filtering done between mipmap levels.
To see this in action, press the 4 key.
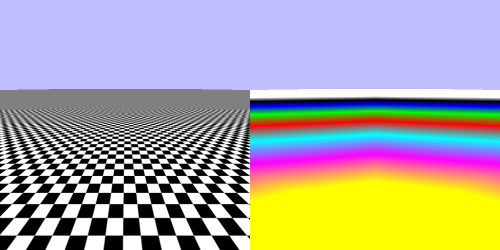
That is an improvement. There are still issues to work out, but it is much harder to see where one mipmap ends and another begins.
OpenGL actually allows all combinations of NEAREST and
LINEAR in minification filtering. Using nearest filtering
within a mipmap level while linearly filtering between levels
(GL_NEAREST_MIPMAP_LINEAR) is possible but not terribly
useful in practice.