There is one major issue left, and it is one that has been glossed over since the beginning of our look at lighting: your screen.
The fundamental assumption underlying all of our lighting equations since the very beginning is the idea that the surface colors and light intensities are all in a linear colorspace. A colorspace defines how we translate from a set of numerical values to actual, real colors that you can see. A colorspace is a linear colorspace if doubling any value in that colorspace results in a color that is twice as bright. The linearity refers to the relationship between values and overall brightness of the resulting color.
This assumption can be taken as a given for our data thus far. All of our diffuse and specular color values were given by us, so we can know that they represent values in a linear RGB colorspace. The light intensities are likewise in a linear colorspace. When we multiplied the sun and ambient intensities by 3 in the last section, we were increasing the brightness by 3x. Multiplying the maximum intensity by 3 had the effect of reducing the overall brightness by 3x.
There's just one problem: your screen does not work that way. Time for a short history of television/monitors.
The original televisions used an electron gun fired at a phosphor surface to generate light and images; this is called a CRT display (cathode ray tube). The strength of the electron beam determined the brightness of that part of the image. However, the strength of the beam did not vary linearly with the brightness of the image.
The easiest way to deal with that in the earliest days of TV was to simply modify the incoming image at the source. TV broadcasts sent image data that was non-linear in the opposite direction of the CRT's normal non-linearity. Thus, the final output was displayed linearly, as it was originally captured by the camera.
The term for this process, de-linearizing an image to compensate for a non-linear display, is called gamma correction.
You may be wondering why this matters. After all, odds are, you do not have a CRT-based monitor; you probably have some form of LCD, plasma, LED, or similar technology. So what does the vagaries of CRT monitors matter to you?
Because gamma correction is everywhere. It's in DVDs, video-tapes, and Blu-Ray discs. Every digital camera does it. And this is how it has been for a long time. Because of that, you could not sell an LCD monitor that tried to do linear color reproduction; nobody would buy it because all media for it (including your OS) was designed and written expecting CRT-style non-linear displays.
This means that every non-CRT display must mimic the CRT's non-linearity; this is built into the basic video processing logic of every display device.
So for twelve tutorials now, we have been outputting linear RGB values to a display device that expects gamma-corrected non-linear RGB values. But before we started doing lighting, we were just picking nice-looking colors, so it did not matter. Now that we're doing something vaguely realistic, we need to perform gamma-correction. This will let us see what we've actually been rendering, instead of what our monitor's gamma-correction circuitry has been mangling.
A gamma function is the function that maps linear RGB space to non-linear RGB space. The gamma function for CRT displays was fairly standard, and all non-CRT displays mimic this standard. It is ultimately based on a math function of CRT displays. The strength of the electron beam is controlled by the voltage passed through it. This correlates with the light intensity as follows:

This is called a gamma function due to the Greek letter γ (gamma). The input signal directly controls the voltage, so the input signal needed to be corrected for the power of gamma.
Modern displays usually have gamma adjustments that allow the user to set the display's gamma. The default is usually a gamma of around 2.2; this is a useful compromise value and an excellent default for our gamma-correction code.
So, given the gamma function above, we need to output values from our shader that will result in our original linear values after the gamma function is applied. This is gamma correction, and the function for that is straightforward.

It would be interesting to see a graph of these functions, to speculate about what we will see in our gamma-correct images.

Without gamma correction, our linearRGB colors (the diagonal line in the graph) would become the CRT gamma curve at the bottom. This means that what we have been seeing is a severely darkened version of our colors. A linearRGB value of 0.5 drops to an intensity of 0.218; that's more than half of the brightness gone.
With proper gamma correction, we can expect to see our scene become much brighter.
Gamma correction is implemented in the Gamma Correction tutorial.
The K key toggles gamma correction. The default gamma value is 2.2, but it can be raised and lowered with the Y and H keys respectively.
That is very bright; it uses the same HDR-based lighting environment from the previous tutorials. Let's look at some code.
The gamma value is an odd kind of value. Conceptually, it has nothing to do with
lighting, per-se. It is a global value across many shaders, so it should be in a UBO
somewhere. But it is not a material parameter; it does not change from object to
object. In this tutorial, we stick it in the Light uniform
block and the LightBlockGamma struct. Again, we steal a float
from the padding:
Example 12.7. Gamma LightBlock
struct LightBlockGamma
{
    glm::vec4 ambientIntensity;
    float lightAttenuation;
    float maxIntensity;
    float gamma;
    float padding;
    PerLight lights[NUMBER_OF_LIGHTS];
};
For the sake of clarity in this tutorial, we send the actual gamma value. For performance's sake, we ought send 1/gamma, so that we do not have to needlessly do a division in every fragment.
The gamma is applied in the fragment shader as follows:
Example 12.8. Fragment Gamma Correction
accumLighting = accumLighting / Lgt.maxIntensity;
vec4 gamma = vec4(1.0 / Lgt.gamma);
gamma.w = 1.0;
outputColor = pow(accumLighting, gamma);
Otherwise, the code is mostly unchanged from the HDR tutorial. Speaking of which, gamma correction does not require HDR per se, nor does HDR require gamma correction. However, the combination of the two has the power to create substantial improvements in overall visual quality.
One final change in the code is for light values that are written directly, without any lighting computations. The background color is simply the clear color for the framebuffer. Even so, it needs gamma correction too; this is done on the CPU by gamma correcting the color before drawing it. If you have any other colors that are drawn directly, do not forget to do this.
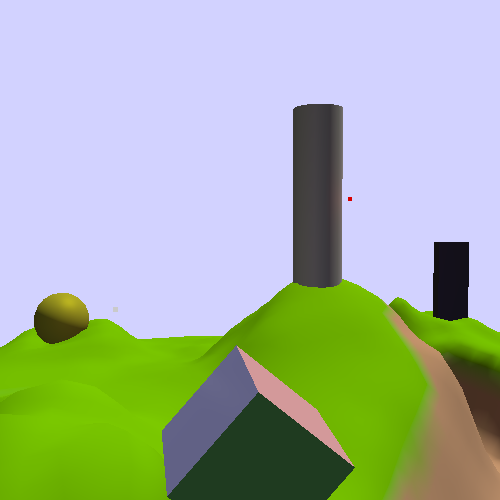
What we have seen is what happens when you apply HDR lighting to a scene who's light properties were defined without gamma correction. Look at the scene at night; the point lights are extremely bright, and their lighting effects seem to go much farther than before. This last point bears investigating.
When we first talked about light attenuation, we said that the correct attenuation function for a point light was an inverse-square relationship with respect to the distance to the light. We also said that this usually looked wrong, so people often used a plain inverse attenuation function.
Gamma is the reason for this. Or rather, lack of gamma correction is the reason. Without correcting for the display's gamma function, the attenuation of 1/r2 effectively becomes (1/r2)2.2, which is 1/r4.4. The lack of proper gamma correction magnifies the effective attenuation of lights. A simple 1/r relationship looks better without gamma correction because the display's gamma function turns it into something that is much closer to being in a linear colorspace: 1/r2.2.
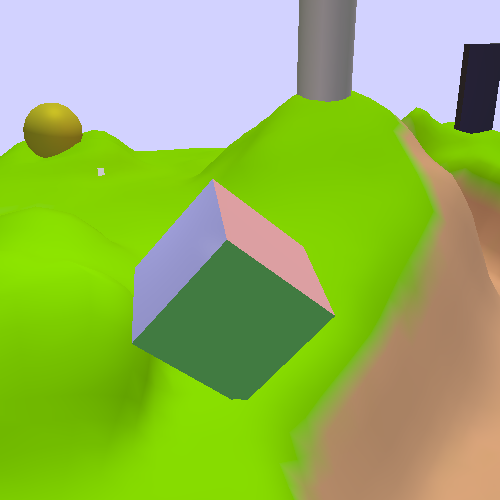
Since this lighting environment was not designed while looking at gamma correct results, let's look at some scene lighting that was developed with proper gamma in mind. Turn on gamma correction and set the gamma value to 2.2 (the default if you did not change it). The press Shift+L:
This is more like it.
If there is one point you should learn from this exercise, it is this: make sure that you implement gamma correction and HDR before trying to light your scenes. If you do not, then you may have to adjust all of the lighting parameters again, and you may need to change materials as well. In this case, it was not even possible to use simple corrective math on the lighting environment to make it work right. This lighting environment was developed essentially from scratch.
One thing we can notice when looking at the gamma correct lighting is that proper gamma correction improves shadow details substantially:
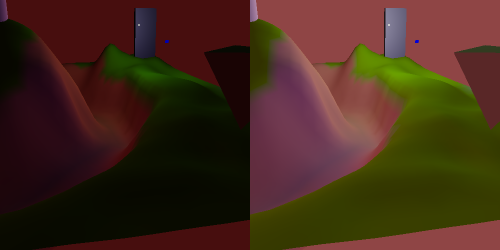
These two images use the HDR lighting; the one on the left does not have gamma correction, and the one on the right does. Notice how easy it is to make out the details in the hills near the triangle on the right.
Looking at the gamma function, this makes sense. Without proper gamma correction, fully half of the linearRGB range is shoved into the bottom one-fifth of the available light intensity. That does not leave much room for areas that are dark but not too dark to see anything.
As such, gamma correction is a key process for producing color-accurate rendered images. It allows details within darkness to show up much more easily.